[Spring Boot] QueryDSL - 검색 쿼리 작성 예시
QueryDSL을 사용해서 검색 쿼리를 작성하는 방법에 대해서 공유하고자 한다.
# 요구사항 예시
"모집 글(Recruit)"이라는 엔티티를 10개씩 검색해서 페이징 처리해서 내려줘야 한다.
Recruit은 보통 게시물이라고 생각하면 편할 것이다.
# QueryDSL 리포지토리 구조
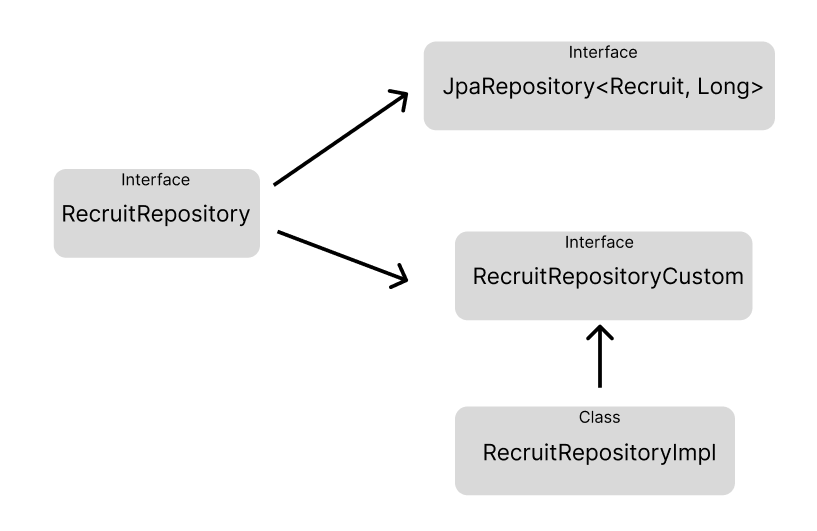
본인은 QueryDSL로 리포지토리를 구성할 때 위와 같은 구조를 가장 많이 채택한다.
사용해 보니 이 구조가 가장 깔끔한 것 같다.
RecruitRepositoryCustom에 검색을 위한 search 메소드를 구현할 것이다.
# RecruitController
@GetMapping("/recruit")
public ApiResponse<PageResponse<RecruitCardResponse>> searchRecruit(
        @PageableDefault(sort = "id", direction = Sort.Direction.DESC) Pageable pageable,
        @RequestParam("keyword") String keyword,
        @RequestParam("type") String type,
        @RequestParam("sort") String sort
) {
    return success(recruitService.search(pageable, sort, RecruitSearchType.toType(type), keyword));
}
keyword는 검색어이고, type은 어떤 기준으로 검색할 것인지 (제목, 내용, 제목+내용), sort는 정렬기준 (조회순, 최신순)을 명시한다.
RecruitSearchType
@AllArgsConstructor
public enum RecruitSearchType {
    TITLE, MIX, NAME;
    public static RecruitSearchType toType(String stringParam) {
        return switch (stringParam) {
            case "title" -> TITLE;
            case "name" -> NAME;
            // mix
            default -> MIX;
        };
    }
}
문자열로 받은 정렬기준을 Sort 객체로 변환해주는 편의 메소드를 가지고 있는 Enum 클래스이다.
Pageable에 정렬 조건을 받는데, sort로 따로 뺀 이유는 커스텀하기 위해서이다.
(뭔가 데이터를 중복으로 받는 것 같지만..일단 작성할 때는 더 좋은 방법이 떠오르지 않았다. 알고 계시면 알려주세요!)
# RecruitRepository
public interface RecruitRepository extends JpaRepository<Recruit, Long>, RecruitRepositoryCustom {
}
서비스 레이어에서 (RecruitService) 의존성 주입받아서 사용할 RecruitRepository 인터페이스이다. JpaRepository와 우리가 만들 RecruitRepositoryCustom을 상속받아준다.
# RecruitRepositoryCustom
public interface RecruitRepositoryCustom {
    Page<Recruit> search(
            Pageable pageable,
            SortType sortType,
            RecruitSearchType type,
            String keyword
    );
}
RecruitRepositoryCustom에는 검색 메소드를 선언해 주고, Impl에서 구현해 준다.
# RecruitRepositoryImpl
@RequiredArgsConstructor
public class RecruitRepositoryImpl implements RecruitRepositoryCustom {

    private final JPAQueryFactory queryFactory;

    @Override
    public Page<Recruit> search(
            Pageable pageable,
            SortType sortType,
            RecruitSearchType type,
            String keyword
    ) {
        JPQLQuery<Recruit> prefixQuery = queryFactory.selectFrom(recruit)
                .leftJoin(recruit.plubbing, plubbing)
                .fetchJoin()
                .leftJoin(plubbing.plubbingSubCategories, plubbingSubCategory)
                .leftJoin(plubbingSubCategory.subCategory, subCategory)
                .distinct();

        JPQLQuery<Recruit> middleQuery = switch (type) {
            case TITLE -> prefixQuery.where(recruit.title.contains(keyword));
            case NAME -> prefixQuery.where(plubbing.name.contains(keyword));
            // MIX = TITLE_INTRO
            default -> prefixQuery.where(recruit.title.contains(keyword)
                    .or(recruit.introduce.contains(keyword)));
        };

        OrderSpecifier<?> order; // types : String, Integer
        if (sortType == SortType.POPULAR) {
            order = recruit.views.desc();
        } else {
            order = recruit.modifiedAt.desc();
        }
        return PageableExecutionUtils.getPage(middleQuery
                        .orderBy(order)
                        .offset(pageable.getOffset())
                        .limit(pageable.getPageSize())
                        .fetch(),
                pageable,
                middleQuery::fetchCount);
    }
}
코드가 좀 길지만 하나하나 차분히 보면 충분히 이해할 수 있다.
JPQLQuery<Recruit> prefixQuery = queryFactory.selectFrom(recruit)
        .leftJoin(recruit.plubbing, plubbing)
        .fetchJoin()
        .leftJoin(plubbing.plubbingSubCategories, plubbingSubCategory)
        .leftJoin(plubbingSubCategory.subCategory, subCategory)
        .distinct();
먼저 조인과 fetchJoin을 통해 한 번에 엔티티들을 불러오고, distinct를 걸어준다.
꼭 distinct를 해줘야 나중에 중복된 엔티티 값들이 안 들어가니까 명심하자.
JPQLQuery<Recruit> middleQuery = switch (type) {
    case TITLE -> prefixQuery.where(recruit.title.contains(keyword));
    case NAME -> prefixQuery.where(plubbing.name.contains(keyword));
    // MIX = TITLE_INTRO
    default -> prefixQuery.where(recruit.title.contains(keyword)
            .or(recruit.introduce.contains(keyword)));
};
중간 쿼리는 검색 타입 (제목, 내용, 제목+내용)에 따라 where 절이 나뉘는 조건 분기 처리 부분이다.
name이랑, introduce 등 변수명이 조금 다른데, 그냥 이런 식으로 나눠서 작업한다고만 알고 넘어가면 될 것 같다.
OrderSpecifier<?> order; // types : String, Integer
if (sortType == SortType.POPULAR) {
    order = recruit.views.desc();
} else {
    order = recruit.modifiedAt.desc();
}
이제 정렬 조건을 추가한다. SortType은 커스텀 Enum 클래스로 정렬 조건을 정의해 놓았다. (조회순, 최신순)
위와 같이 OrderSpecifier에 들어갈 타입이 서로 다르면 (String과 Integer) 와일드카드 (?)를 사용하면 된다.
return PageableExecutionUtils.getPage(middleQuery
                .orderBy(order)
                .offset(pageable.getOffset())
                .limit(pageable.getPageSize())
                .fetch(),
        pageable,
        middleQuery::fetchCount);
마지막으로 PageableExecutionUtils를 사용해서 Page<Recruit>를 만들어서 리턴하면 된다.
orderBy부분에 위에서 만든 order 객체를 넣어준다.
PageImpe<>()을 사용해도 되지만, Page를 만들 때 필요한 전체 수를 측정하는 count 쿼리를 이 PageableExecutionUtils가 더 효율적으로 계산하기 때문에 되도록이면 PageImpl 대신 PageableExecutionUtils를 사용하는 게 좋다.
지금까지 QueryDSL을 사용하여 검색 쿼리를 작성하는 예시를 알아보았다.